


Preface
To help establish an early foundation, it is important to understand these 5 common algorithms often seen in rate limiting.
If you are not familiar with what a rate limiter is, check out this "Easy" article I previously wrote: Rate Limiters Made Easy For quick review, I discussed the previous rate limiting algorithm, Fixed Window Counter, here.
This is part of my series on learning how to pass system design interviews.
Here are the 5 Most Commonly Seen Rate Limiting Algorithms in Real Production Environments
- Token Bucket - Learn
- Leaking Bucket - Learn
- Fixed Window Counter - Learn
- Sliding Window Log - Learn
- Sliding Window Counter - Learn
Sliding Window Log
By now you should have familiarized yourself with the token bucket, leaking bucket, and fixed window counter rate-limiting algorithms. Many of those same concepts carry into learning the sliding window log algorithm.
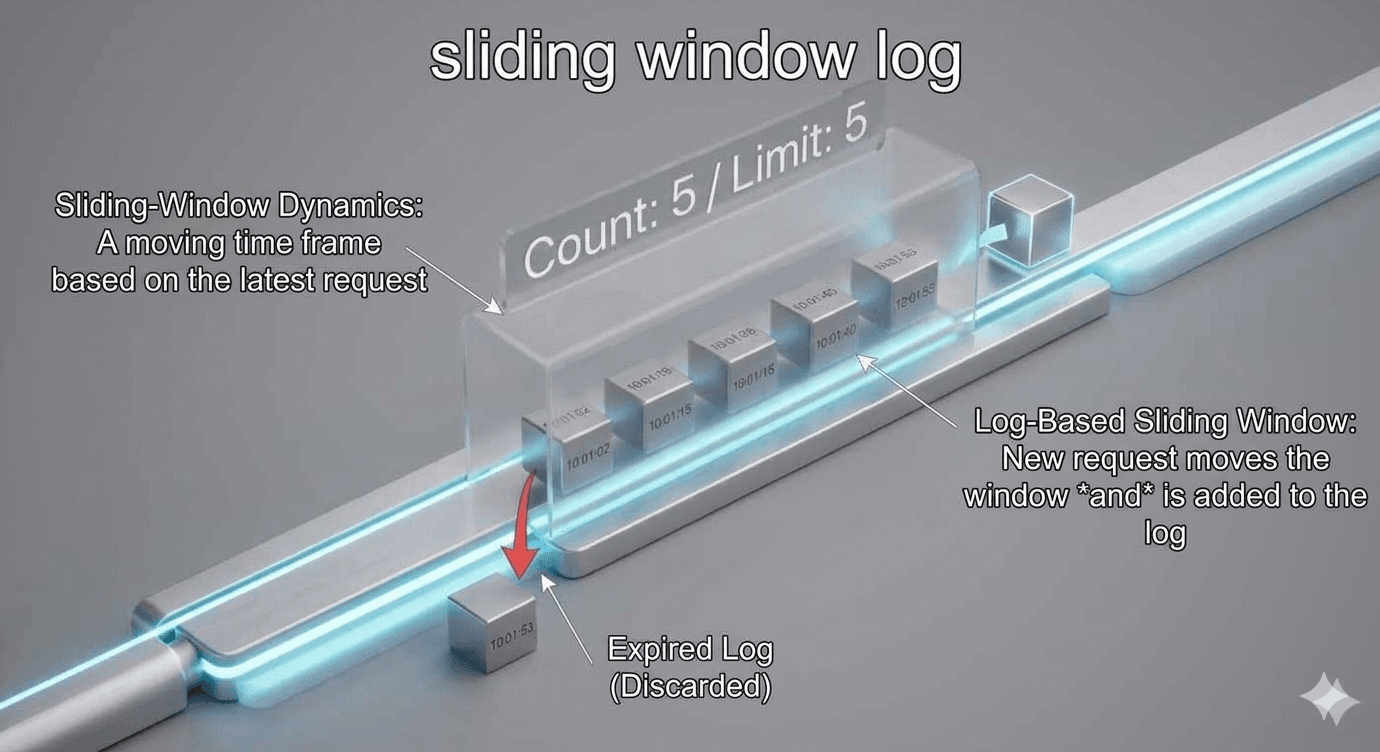
The sliding window log improves on the fixed window counter by eliminating the 'edge case' problem, where request bursts at window boundaries could bypass rate limits. Instead of static blocks of time, it tracks an individual timestamp for every request. By checking the log against a rolling 60-second look back, it ensures the limit is strictly enforced regardless of when the window starts.
How it Works
Each request is tracked with a timestamp at the exact time it is received. The data for timestamp data is kept in cache, like sorted sets in Redis.
When a new request is received, we look at the current timestamp and remove anything older than, let's say for this example, 60 seconds. So all timestamps longer than 60 seconds from the start of the newest request is removed.
We want to update the logs for our timestamp, which basically keeps track of how many requests are currently allowed to be within the sliding window, total requests sent during the window, and their timestamps. So, we add the new timestamp of the new request to the log.
Finally, we check if the current log size is the same or lower than the allowed count for our assigned sliding window value, if this is true the request is accepted. If not, the request is dropped or rejected.
That's the basic understanding! Congratulations on learning the sliding window log rate limiting algorithm!
Real Examples
- Every Request is a Timestamp: Instead of just incrementing a counter, the system writes down the exact time of every single request you make (e.g., 1:00:02, 1:00:15, 1:00:40).
- The Rolling Look-Back: Whenever a new request comes in at 1:00:50, the algorithm looks back exactly 60 seconds to 12:59:50.
- Self-Cleaning Logs: It instantly deletes any timestamps older than that 60-second mark. They are "out of the window" and no longer count against your quota.
- The Math Check: It counts the remaining timestamps in the log. If there are fewer than 10, your new request is added to the list and allowed through.
- No Edge-Gaming: Because the "window" is relative to your <em>current</em> request rather than a fixed clock, there is no way to double the quota by timing the boundary.
- The Result: For any 60-second slice of time you pick on the timeline, the user is strictly held to the limit.
In real production environments, you should be aware of common situations and areas to integrate this algorithm. Here are some examples of when you could integrate sliding window log.
- Precise Security Throttling: This algorithm is ideal for sensitive endpoints where "boundary bursting" must be avoided by tracking every request's exact timestamp. For example, limiting login attempts to exactly 5 per rolling 60-second window to prevent brute-force attacks from doubling their limit at the turn of a minute.
- Rolling Usage-Based Billing: It is perfect for premium SaaS tiers that enforce fair usage over a continuous look-back period rather than a fixed calendar reset. For example, allowing a "Professional Tier" user exactly 1,000 API calls in any 24-hour period, ensuring the limit is always enforced relative to their last request.
- High-Integrity Financial Operations: It ensures system stability during high-volatility events by preventing automated "gaming" of rate limits through precise log-based tracking. For example, limiting a high-frequency trading bot to exactly 50 "Cancel/Replace" orders per rolling 100 milliseconds to maintain exchange order-book integrity.
Conclusion
In conclusion, you should know when to choose the sliding window log versus the fixed window counter. You should use sliding window log when accuracy is non-negotiable, like if allowing any burst of the traffic at the turn of a minute would crash your downstream service. If you have low traffic volume, this algorithm is best for endpoints that don't receive millions of hits per second per user. Another common area you should use this is security-critical endpoints. Think login attempts, password resets, or high-value financial transactions where attackers might try to "game" the edge of a fixed minute to double their brute-force speed. Last thing to mention is that because of this dynamic updating of the logs, the memory allocation is more intense than fixed window counter. Now you should have a good idea of how it works and the tradeoffs you should consider!
For the sake of time and proper learning retention, I will discuss the rest of the algorithms in future blogs.
In my next blog, I will discuss the last most common rate limiting algorithm.
Summary
Thank you for reading my blog post!
To continue learning the fundamentals of System Design, the next important fundamental to learn is understanding...
Make sure to check out the additional blogs here for materials to help you throughout your learning journeys!
Credit: ByteByteGo - Design a Rate Limiter