


Preface
To help establish an early foundation, it is important to understand these 5 common algorithms often seen in rate limiting.
If you are not familiar with what a rate limiter is, check out this "Easy" article I previously wrote: Rate Limiters Made Easy For quick review, I discussed the previous rate limiting algorithm, Sliding Window Log, here.
This is part of my series on learning how to pass system design interviews.
Here are the 5 Most Commonly Seen Rate Limiting Algorithms in Real Production Environments
- Token Bucket - Learn
- Leaking Bucket - Learn
- Fixed Window Counter - Learn
- Sliding Window Log - Learn
- Sliding Window Counter - Learn
Sliding Window Counter
By now you should have familiarized yourself with the token bucket, leaking bucket, fixed window counter, and sliding window log rate-limiting algorithms.
Now we will incorporate two of those algorithms for the sliding window counter. The sliding window counter is a combination of the fixed window counter and the sliding window log.
The Sliding Window Counter is designed to be more accurate than simple "fixed window" counters while being more memory-efficient than "log-based" systems. Instead of resetting your request limit at a hard boundary (like exactly every minute), it approximates a "rolling" window by blending data from the current and previous time slots. There are two ways to implement this algorithm, but for this blog I will only discuss one implementation.
How it Works
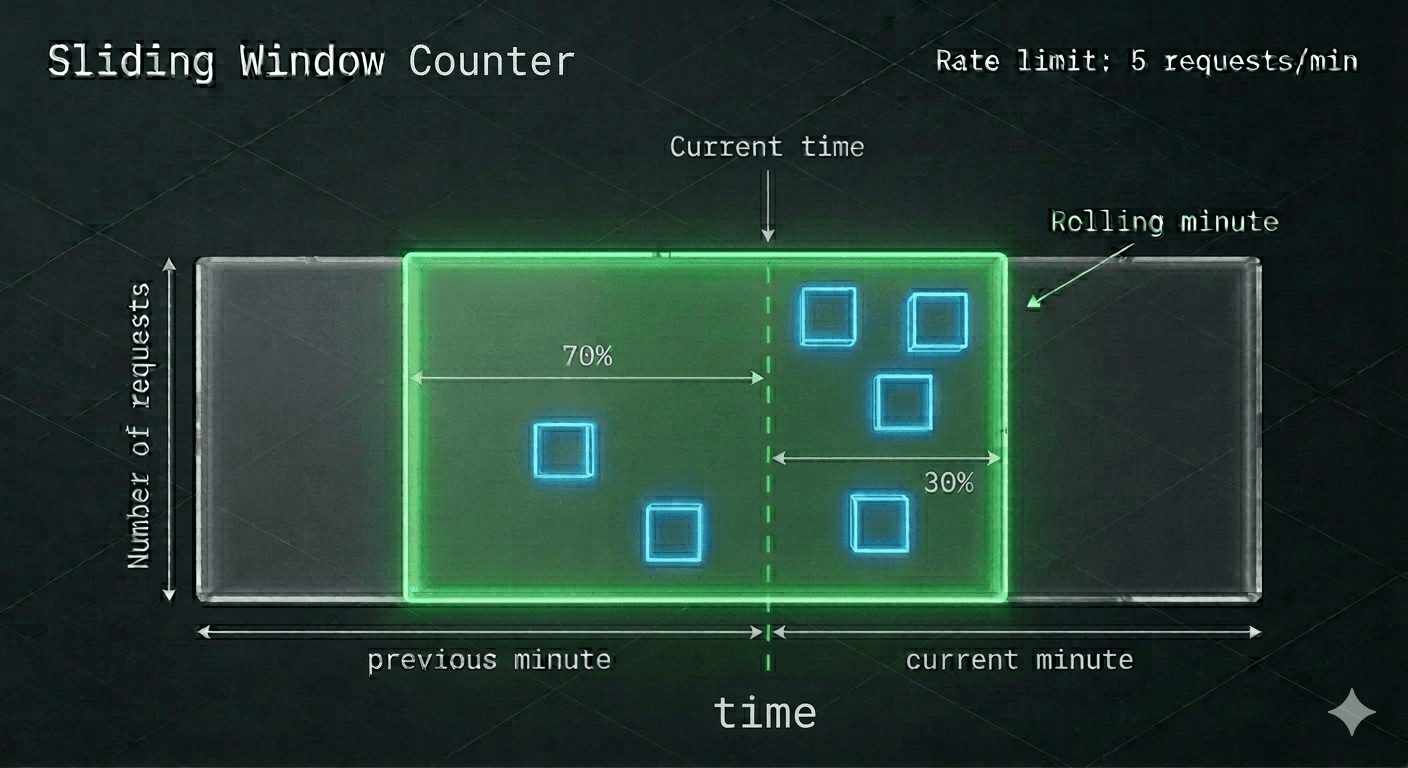
Divide the Time: First we want to find the current previous minute and assign it a block. Then, to the right assign another block. This can be seen in the graphic as the grey blocks with the arrows indicating the range.
Track Two Counters: The system tracks how many requests happened in the previous window and how many have happened in the current window. Within the infographic, these are represented by the blue blocks. The blue blocks represent the requests within that window.
Determine the Sliding Window: The green box is the "sliding window". This window will be responsible for determining the range of the "most current up-to-date window" and prevents the edge case spamming we previously discussed in fixed-window-counter.
Combining the Two Concepts: The green box represents the sliding window log behavior, while the blue boxes within the green box represents the fixed-window-counter behavior. Great! Now, we have to perform one final calculation to determine the maximum allowed requests. We'll call this formula the "approximate actual rate".
Calculate Approximate Actual Rate: When a new request arrives, the algorithm calculates a "weighted" total of the two windows based on how far you are into the current one.
- Assume the maximum requests per minute has been set at 6.
- The formula for determining the number of requests in the current minute is
[Requests in the current window + Requests in the previous window * overlap percentage of the rolling window and previous window] - Using our infographic, let's identify and plug in the values
associated with the formula above.
- Requests in current window: 4 (blue squares)
- Requests in previous window: 2 (blue squares)
- Overlap percentage of rolling window and previous window: 70% (green square)
Note: If you're confused, look at the green window and then use the percent to the left of the current time. - Using the formula in #2, we get 4+2*70% = 5.4 Requests.
- Depending on the use case, the total requests can be rounded up or down. For this example, we'll round down to 5.
Since the rate-limiter allows a max of 6 requests to go through, if we add in another request to the current window, it can go through. However, any more requests after this result in reaching the rate-limit and subsequently be dropped.
That's the basic understanding! Congratulations on learning the sliding window counter rate limiting algorithm!
Real-World Examples
- The Weighted Calculation: Instead of logging every timestamp, the system uses a formula:
(Previous Count * Overlap %) + Current Count. - The Smooth Transition: As time moves, the "70/30" split shifts continuously. This prevents the "burst" of traffic that often happens at the 00:00 second mark of a new minute.
- Memory Efficiency: Unlike log-based tracking, this only stores **two numbers** per user (previous count and current count), making it incredibly fast for high-traffic systems.
- The Result: It provides the precision of a rolling window without the massive database storage required to track millions of individual timestamps.
In production, the Sliding Window Counter is the "gold standard" for scale. Here is where you’ll see it integrated:
- Global API Gateway Throttling: Used by platforms like Cloudflare or AWS to protect backend services.Example: A "Free Tier" API key is limited to 60 requests per rolling minute. The weighted counter ensures they can't send 60 at 1:59 and another 60 at 2:01.
- Social Media Engagement Limits: Platforms use this to detect bot-like behavior for "Likes" or "Follows" over a rolling window.Example: Limiting a user to 30 "Likes" per rolling 5-minute window to discourage automated engagement scripts.
- E-commerce Inventory Protection: Prevents "scalper bots" from hitting "Add to Cart" endpoints too frequently during a high-demand drop.Example: Restricting a single IP to 10 cart-add attempts per rolling 30 seconds to ensure fair access for human shoppers.
Conclusion
In conclusion, the Sliding Window Counter is the "Goldilocks" of rate limiting, balancing the high accuracy of a rolling log with the extreme memory efficiency of a fixed counter. You should choose this weighted approach when you need to prevent "boundary bursting" at the turn of a minute without the massive storage overhead of tracking every individual timestamp. It is the industry standard for high-traffic API gateways and professional SaaS platforms where millions of users must be throttled simultaneously. By using the 70/30 weighted formula shown above, you ensure a smooth, fair experience that can't be "gamed" by attackers, while keeping your system's memory footprint light and fast. Now you have a clear understanding of how this dynamic window protects your services while scaling with your traffic!
For the sake of time and proper learning retention, I will discuss the remaining portion of understanding how to design a rate-limiter in my next blog.
This concludes the 5 most common rate-limiting algorithms!
Congratulations on learning these and be sure to review them in the future for refreshing your understandings! I will discuss the next important parts to understand how to correctly design a rate limiter in large-scale production environments soon!
Summary
Thank you for reading my blog post!
To continue learning the fundamentals of System Design, the next important fundamental to learn is understanding...
Make sure to check out the additional blogs here for materials to help you throughout your learning journeys!
Credit: ByteByteGo - Design a Rate Limiter