


Preface
To help establish an early foundation, it is important to understand these 5 common algorithms often seen in rate limiting.
If you are not familiar with what a rate limiter is, check out this "Easy" article I previously wrote: Rate Limiters Made Easy For quick review, I discussed the Token Bucket rate limiting algorithm here.
This is part of my series on learning how to pass system design interviews.
Here are the 5 Most Commonly Seen Rate Limiting Algorithms in Real Production Environments
- Token Bucket - Learn
- Leaking Bucket - Learn
- Fixed Window Counter - Learn
- Sliding Window Log - Learn
- Sliding Window Counter - Learn
Fixed Window Counter
By now you should have familiarized yourself with the token bucket and leaking bucket rate-limiting algorithms. Many of those same concepts carry into learning the fixed window counter algorithm.
In order to make this easy to understand, I'm going to ask you to visualize a chart. We're going to now divide ten minutes, into one minute "fixed-windows", so we can allocate and organize our time. Every minute is divided into it's own "window".
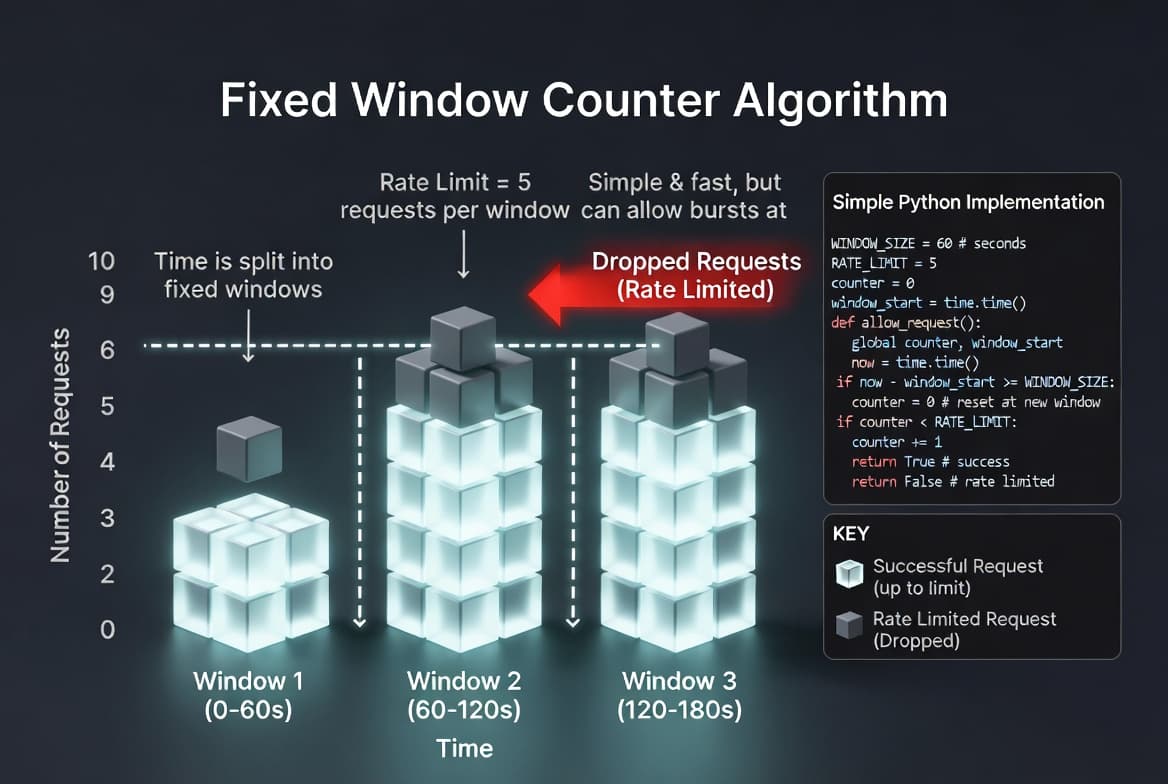
How it Works
For each minute fixed time window, we now assign a counter. So if we are dealing with web requests from a website, each request increases this counter by 1.
For every window, we can assign a fixed amount of blocks. Let's say we do 10 blocks for every minute. Once you reach 10 requests in 1 minute, you reach the maximum allowed requests.
Now that you have sent 10 requests within 1 minute, any extra requests are "rate-limited". All new requests after this max-threshold will be dropped until you move into the next minute fixed time window.
That's the basic idea! Congratulations on learning the fixed-window-counter basics!
Understanding the Potential Problems
Remember how you could spam messages in the token bucket algorithm? If you spam requests near the edges of the time window, this can cause more requests than the allocated amount to pass through.
Picture This
- You are at 1 minute and 30 seconds.
- You send 10 requests at this time.
- Now the timer hits 2 minutes, and you send 10 more requests before 2 minutes and 30 seconds.
- This seems ok on the surface, but you actually doubled the quota!
- The key insight is for ANY MINUTE RANGE, you should only be allowed to send max 10 requests.
- If you look at the timeline, 1:30-2:30, that's one minute.
- However, because you timed the window to be on the edge, you can accidentally double the allowed quota!
In real production environments, you should be aware of common situations and areas to integrate this algorithm. Here are some examples of when you could integrate fixed window counter.
- Simplicity and Performance: This algorithm is ideal for high-scale applications because it requires minimal memory and processing power to track request counts within a set time block. For example, limiting login attempts to 5 per minute to prevent brute-force attacks.
- Enforcing Hard Quota Resets: It is perfect for services that reset usage limits at specific intervals (like the top of every hour), ensuring users stay within their allotted budget. For example, allowing 1,000 free API calls per calendar month.
- Predictable Resource Allocation: It helps distribute system load by ensuring that no single user can monopolize resources during a specific window, even if the traffic is slightly "bursty" at the boundaries. For example, limiting a user to 100 search queries every 15 minutes.
Conclusion
In conclusion, the fixed window counter is memory efficient, easy to understand (especially now), and resetting available quota at the end of a unit time window fits certain use cases. The downside is the spike in traffic at edges of the window that could double the requests within the range like I discussed previously.
For the sake of time and proper learning retention, I will discuss the rest of the algorithms in future blogs.
In my next blog, I will discuss the last 2 most common rate limiting algorithms.
Summary
Thank you for reading my blog post!
To continue learning the fundamentals of System Design, the next important fundamental to learn is understanding...
Make sure to check out the additional blogs here for materials to help you throughout your learning journeys!
Credit: ByteByteGo - Design a Rate Limiter