

High-Quality Git Commit Messages - Official Guidelines
Learning to write concise yet detailed Git commit messages is one of the most valuable fundamentals I've learned.
You and your teammates will find this style of writing Git commit messages far more effective when you need to revert back to a working version.
You'll see how useful it can be when you start applying these practices in your own git messages.
But when should you keep it short versus providing more detail?
Perfect Long Form Example
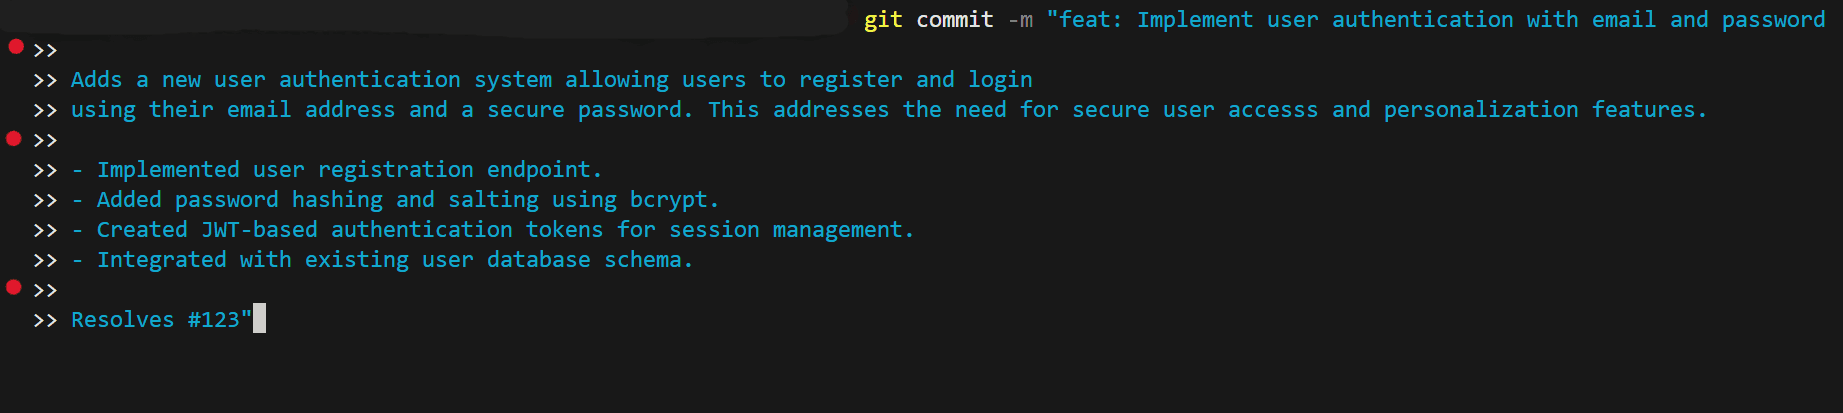
Observe and look at the different parts. Notice the red dots on the left of the code snippet?
These are key spaces in between each section that helps organize the message into 4 distinct parts. We will go over this in further detail, for now create a mental map of this formatting for long messages.
Perfect Short Form Example
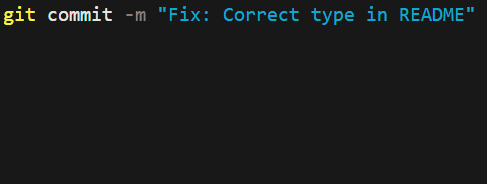
Here is a simple short message, notice the difference between the short and the long.
General Rule
Aim for a short subject line (first line), usually 50 characters or fewer that summarizes the change.
For longer messages, explain the "what and the why" and wrap at 72 characters.
For shorter messages, explain the small self-contained change where the "what" and the "why" are contexually obvious given the previous updates to the git message history.
1. How to Write the Subject Line (First Line)
- Keep summary concise — 50–72 characters max
- Use imperative mood → "Add", "Fix", "Update", "Remove"
- Capitalize the first letter
- No period at the end
- Optional: Use conventional prefixes →
feat: Add feature,fix: Fix website render issue,docs: Create README,refactor: Improve factorial with memoization, etc.
2. Follow up with a Blank Line
Remember the red dots previously mentioned in the long form example?
Always leave one blank line between the subject and body.
3. For Long Messages: Body (Detailed Explanation)
A long-form Git commit message typically follows a structured format designed for clarity and comprehensive explanation of changes. This format generally includes a concise subject line followed by a more detailed body, separated by a blank line.
- Detailed Explanation: Provides a more in-depth description of the changes, explaining what was done and why, rather than how. (code shows the how)
- Context and Rationale: Explain the problem being solved, the motivation behind the change, and any relevant context or design decisions.
- Paragraphs and Bullet Points: Use paragraphs for longer explanations and bullet points for lists of changes or features.
- Use blank lines to separate paragraphs
- Wrap at 72 Characters: Lines in the body should be wrapped at approximately 72 characters for readability in standard terminal widths.
- Reference issues or PRs when relevant →
Closes #123,Resolves #456
4. For Short Messages: Body (Short Explanation)
A common short-form Git commit message format emphasizes a concise, informative subject line. This format is particularly useful for quick commits or when the changes are self-explanatory.
- Concise Summary: A brief, clear summary of the change.
- Length Limit: Typically limited to around 50 characters to ensure readability in various Git tools (e.g., git log --oneline).
- Imperative Mood: Use the imperative mood (e.g., "Fix bug," "Add feature," "Update documentation") as if giving a command.
- Capitalization: Capitalize the first letter of the subject line.
- Use blank lines to separate paragraphs
- No Period: Do not end the subject line with a period.
5. When to Use Short vs. Long Commit Messages
Now, you're probably asking, how often should I be committing?
You should commit frequently and make small atomic changes. This makes it easier to track changes, revert mistakes, and understand commit history.
Wait, what is an atomic commit?
Great question! An atomic commit is a commit that represent a single complete, and logically isolated change to the codebase. The key principle is that each commit does one thing and one thing only.
- Single Logical Unit: An atomic commit should address one specific task, such as fixing a bug, adding a minor feature, or refactoring a specific function. It should not mix unrelated changes like a bug fix and a formatting change in the same commit.
- Completeness and Stability: When committed, the codebase should remain in a working and stable state. All tests should pass, ensuring that the change doesn't break the build for other developers.
- Indivisibility: The change is indivisible; if you needed to revert the change, you could do so with a simple git revert command without unintentionally undoing other work.
Short versus Long
Choose the message length based on how often you commit and the complexity of the changes.
Frequent, small commits pair best with short, subject-only messages, while larger or more involved changes deserve a full message with a detailed body.
- Use short messages frequently: Ideal for tiny, incremental changes (e.g., fixing a typo, refactoring a single function, or adding a small feature). Commit often with a frequency of multiple times per hour to keep history clean and scannable.
- Use long messages sparingly: Reserve for changes that span multiple files, alter behavior in non-obvious ways, or need explanation (e.g., why a specific approach was chosen). This is typically a few times per day or per feature.
As you start implementing these learnings, you'll start to understand when you may need short messages and when longer messages are more appropriate.
Summary
Mastering the art of thoughtful Git commit messages transforms your version history from a mere log into a clear, professional narrative that benefits you and your team for years to come.
Start small by applying these guidelines in your next commit and you'll quickly see how much easier debugging, reviewing, and collaborating becomes.
Thank you for reading my blog post!
To continue learning the fundamentals of Git, a very important fundamental to learn is how to properly branch and when to utilize them. This will be the next topic.
Make sure to check out the additional blogs here for materials to help you throughout your learning journeys!